Monday is my crafts morning, and this Monday, I was delighted that everyone could attend. There was only one problem. Playing hostess, chatting and doing craft can be one multi-task too far. I’d have to think of an activity that I could do without requiring too much concentration.
With multiple birthdays coming up, I decided on card making using stamps. Rather than worrying about how I would apply them, I simply stamped away, chatting with my friends and pouring coffee.
By the end of the morning, I had covered several sheets and had the quiet and leisure to think how to use them.
Card creations
The stamps I’d used were a mixture of commercial and homemade stamps (I’ll show you how to make your own further on). And though you could just place a stamp on a card and mount it, I preferred to do my own thing.
My son is an engineer and constantly flying, so the airmail one was perfect for him. My niece loves nature, so what better than flowers and bees?
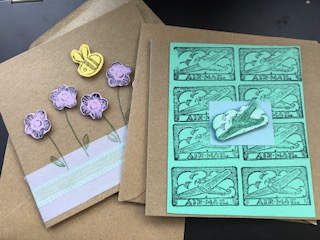
The options when using stamps are endless. Here I used a sheet of stamps (right) and made a cut-out, which I coloured, to give extra interest. Using sticky squares can give an engaging 3D quality.
On the left, I made a washi tape border and ‘planted’ my flowers above, cutting them out and mounting them, and a bee, on a sticky square.
In both, I used a black ink pad, on coloured paper. Black gives the best definition, but colour is always an option.
One thing leads to another
Delighted with my cards, I was not yet ready to give up playing with stamps. What else could I do?
Sorting through my fairly large collection, I found some beautiful ones for book plates. With so many bookish friends, they would make perfect little gifts.


Ideally, book plates are easy to use, so I found some Oxfam envelope address labels and stamped on them. Just lick the back and apply. It is not essential to use an adhesive back; however, if you don’t, just remind the recipient they will need glue!
Here I used two ink pads, one blue and one pink. Either looks lovely on their own, but by rolling half the stamp on one and half on the other, you get a gorgeous ombre effect. I had some pretty square envelopes that I’d prepared earlier (how very Blue Perterish of me) and there you have it – a perfect, personal gift.
On a roll, I also decided to make some stickers out of some very old sticky labels I’d found. Envelopes can often do with a little help to adhere properly, so I add stickers. Here are my Christmas ones and some with my initial.
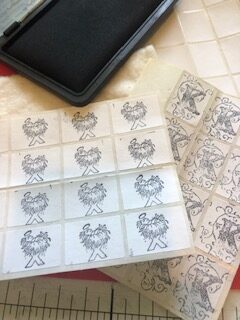
Image: Karen Costell0-McFeat
Bespoke stamps
My darling friend Jenny, once treated me to a lino-cut workshop and I have enjoyed making lino cuts ever since. The initial costs are fairly low and you can make more stamps than you could ever use!
What you need are the following:
- Soft lino cut sheets
- Lino cutter tools
- Ink pads or paints (Acrylics work best with an acrylic print medium)
- A roller for larger images
- A protective mat
- A small piece of soft fabric to place under your paper to make the definition as precise as possible. (Penny pointed this out to me at craft club and she was right.) There I used Jenny’s padded glasses case but a remnant of thick felt or batting is perfect.


Knowing I would need to work fairly quickly to prepare something for this week’s blog, I set about making a very simple, very small design.
Little hearts can be added to just about everything, so I cut a small piece of lino, drew a heart and began.


For more detailed images, draw on paper and transfer with tracing paper. You can download and print a black and white image and use that as your template, but remember everything on your stamp will be reversed!
Lino tools are sharp, so always cut away from yourself. When you are happy, apply a firm back. I had the perfect combination of foam and hard board. Use a glue gun or strong glue to attach.
And when you are finished creating, clean the lino with a damp cloth or baby wipe and dry completely before storing.
Et voila!
And here are my tiny stamps. I like the effect of the grooves marked in the lino, but if I wanted a heart without those, I’d just need to keep cutting until only the heart itself was raised.
With a stamp that should only be uses in one direction, it is worth drawing an arrow on the back.


Of course, the image is not perfect, but for me that is part of the charm. And if you’re wondering what the dots are, they are made with the small rubber at the end of a pencil.
Because stamps are everywhere
Though more elaborate stamps need to be created or purchased, simple forms can be made with the most ordinary of objects. A new eraser can be used as is or with a simple design, ditto potatoes and other root vegetables. String glued to a hard board makes beautiful swirls and many organic items are perfect: feathers, seed tops, leaves and twigs can all be part of your stamp collection.
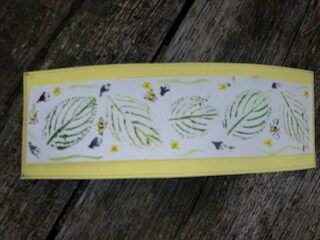
Jenny used a leaf with paint to make this gorgeous design and then embellished it with tiny bees and flowers. Because your prints can just be the starting point for your art. And if it isn’t how you like it? Well, scrunch it up and start again. Your print will work over and over.
A practical craft
What I love about stamps is that they have all sorts of practical applications. They can adorn plain wrapping paper, cards and stationery. They can be used with acrylic paints to decorate fabrics and when you’re really good, can be their own masterpieces.
Best of all, everyone can do it. A little care and a little patience are all that are required to make something personal and precious. And in a mass produced world, that is surely not a bad thing.
I love how you break things down so clearly.
Thank you!